Group
Photo,
left
to
right:
Angelo
Di
Benedetto
(SVP
Worldwide),
Andrew
Fist
(Epicor),
Seamus
Byrne
(TechnologyAdvice),
Naghmeh
Mkhani
(Motorola
Solutions),
Vilesh
Chand
(Rondo
Building
Services),
Scott
Simmons
(BlastOne
International),
Bettina
Turnbull
(Sonova),
Rebecca
Cohen
(TechnologyAdvice),
Graeme
Evans
(Epicor),
Ben
Abbott
(TechnologyAdvice)
TechnologyAdvice
welcomed
an
esteemed
group
of
manufacturing
industry
technology
leaders
to
an
exclusive
roundtable
in
Sydney,
Australia
in
March,
to
explore
how
technology
could
supercharge
their
efforts
to
create
more
connected,
efficient
factories
and
businesses
now
and
into
the
future.
Hosted
in
partnership
with
Epicor,
one
of
the
leading
providers
of
ERP
solutions
globally,
guests
discussed
how
technology
could
empower
manufacturers
to
automate
key
processes
within
their
operations,
from
the
top
floor
to
the
plant
floor.
The
roundtable
looked
at
how
streamlining
operations
could
drive
productivity
and
cut
costs,
boosting
margins
and
revenue
growth.
Industry
leaders
also
looked
at
the
impact
of
artificial
intelligence,
including
how
it
could
accelerate
innovation
through
advanced
MES,
AI
and
machine
learning.
A
huge
thank
you
to
our
guests
and
Epicor
for
sharing
a
wealth
of
experience
and
insight.
With
so
many
different
accounts
and
passwords
to
manage,
it’s
a
good
thing
that
you’re
looking
for
a
password
manager.
However,
the
number
of
password
management
solutions
can
complicate
the
selection
process.
If
you’ve
narrowed
your
search
down
to
Keeper
vs.
KeePass,
you’re
getting
closer
to
making
the
best
decision
for
you.
Keeper
is
an
excellent
choice
because
of
its
many
features
and
secure
reputation;
though,
they
come
at
a
cost.
Alternatively,
KeePass
is
a
free
password
manager
with
limited
features.
Overall,
it’s
important
to
determine
which
is
the
best,
and
our
KeePass
vs.
Keeper
debate
will
help
you.
In
this
comparison,
we
will
explore
the
features,
performance,
pricing
and
overall
user
experience
of
Keeper
vs.
KeePass
to
help
you
decide
the
best
password
manager
for
your
needs.
Keeper
vs.
KeePass:
Comparison
table
Keeper
KeePass
Best
for:
Those
who
want
more
features,
higher
security
and
ease
of
use.
Those
who
want
a
free
service
for
password
protection.
Starting
Price
$2.04/month
Free
(with
donation
options)
Available
Platforms
Android,
iOS,
Linux,
Windows,
Mac
Android,
iOS,
Linux,
Windows,
Mac
Service
and
Support
24/7
ticket
system,
detailed
FAQs
and
guides,
free
Q&A
sessions
and
technical
support
webinars
No
customer
support
team
Browser
Extensions
Internet
Explorer,
Chrome,
Opera,
Safari,
Firefox,
Edge
Only
available
with
plugins
Password
Importing
Yes
Yes
(but
more
tedious)
Password
Sharing
Yes,
with
many
ways
to
share
Yes,
with
fewer
ways
to
share
Password
Generator
Yes
Yes
Autofill
Yes
No
Keeper
vs.
KeePass:
Pricing
The
biggest
difference
between
Keeper
and
KeePass
is
pricing.
KeePass
is
completely
free
but
a
subscription
to
Keeper
costs.
Keeper
pricing
Image:
Keeper
Keeper
divides
its
plans
into
two
groups:
Personal
&
Family
and
Organizations.
Keeper’s
Personal
plan
is
$2.92/month
for
one
user
vault
and
includes:
Unlimited
password
storage.
Unlimited
devices.
Unlimited
password
sharing.
Fingerprint
and
Face
ID.
Emergency
access.
24/7
customer
support.
Keeper’s
Family
plan
is
$6.25/month
for
five
user
vaults
and
includes
everything
in
the
Personal
plan,
plus:
10
GB
secure
file
storage.
Shared
folders,
records
and
manage
permissions.
Keeper’s
Organizations
tier
includes
Business
Starter,
Business
and
Enterprise
plans
with
various
features
to
cater
to
organizations,
small
and
large.
Keeper
offers
a
30-day
trial
for
its
Personal
plan
and
a
14-day
trial
for
its
Business
and
Enterprise
plans.
KeePass
pricing
Image:
KeePass
KeePass
is
an
open-source
password
manager,
which
means
that
many
of
its
features
can
be
configured
through
plugins.
You
can
customize
KeePass
with
as
many
plugins
as
you’d
like
—
free
of
charge.
However,
KeePass
asks
for
donations
upon
sign
in.
Some
premium
features
for
mobile
apps
require
payment.
For
example,
if
you
download
KeePass
from
the
Play
Store,
you
must
pay
$10
to
use
the
password
generator.
Feature
comparison:
Keeper
vs.
KeePass
Whether
you’re
searching
for
an
alternative
to
KeePass
or
believe
that
Keeper
is
ideal,
it’s
still
wise
to
compare
the
features.
Here
are
a
few
notable
features
to
consider:
Password
importing
You
can
import
passwords
from
many
browsers
using
both
KeePass
and
Keeper.
However,
Keeper
seems
more
intuitive
and
allows
you
to
import
passwords
from
other
password
managers
and
browsers.
Though
KeePass
makes
it
possible
to
import
passwords,
it’s
tedious
because
you’ll
need
to
add
a
plugin
for
this
capability.
Password
generator
Most
people
can’t
create
strong
and
unique
passwords
themselves,
so
they
require
a
password
generator.
KeePass
wins
here
because
it
has
many
customizable
options.
You’ll
find
nine
toggles
to
disable
or
enable,
allowing
you
to
choose
the
characters,
symbols
and
length.
Still,
Keeper
has
much
to
offer.
You
can
choose
the
length
of
every
password,
up
to
100
characters,
and
specify
whether
it
should
include
special
characters,
numbers
or
capital
letters.
Password
sharing
Password
sharing
is
a
helpful
feature
that
most
password
managers
offer.
Keeper
is
the
winner
here
because
it
makes
it
easy
to
share
files
and
passwords.
You
have
many
options,
such
as
SMS,
AirDrop,
email
and
links.
The
default
mode
is
set
to
“view
only,”
but
you
can
change
this.
There’s
also
a
one-time
share
feature.
Figure
A:
Keeper
One-Time
Share
Image:
Keeper
KeePass
isn’t
ideal
for
password
sharing.
You
could
share
the
whole
database
by
sending
the
file
through
email.
However,
there
is
no
built-in
messaging
system,
so
it’s
not
easy
or
safe
to
do
this.
Autofill
Autofill
is
excellent
because
it
helps
you
make
payments,
speed
up
the
login
process
and
more.
Luckily,
both
products
have
this
feature,
though
they’re
implemented
in
different
ways.
Keeper
makes
it
easy
to
set
up;
simply
add
it
to
the
browser
extension
or
through
the
app.
Once
you
log
in,
select
the
“autofill
credentials”
toggle
and
click
“enter”
to
go
to
websites
and
apps.
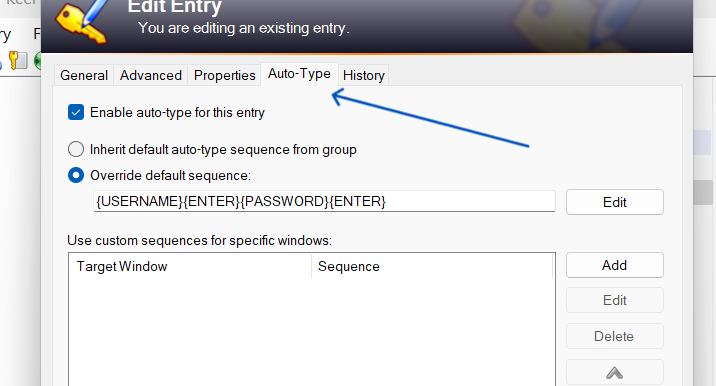
KeePass
doesn’t
offer
an
autofill
feature,
but
it
does
have
Auto-Type.
This
lets
you
choose
keypresses
that
will
happen
automatically.
Still,
it’s
not
as
intuitive
or
user-friendly
as
Keeper.
Figure
B:
KeePass
Auto-Type
Image:
KeePass
Keeper:
Pros
and
cons
Pros
Offline
support,
regardless
of
platform.
Available
on
all
major
browser
extensions,
platforms
and
operating
systems.
BreachWatch
is
available
to
protect
usernames
and
passwords
from
the
Dark
Web.
Having
a
good
password
manager
is
crucial,
but
it’s
often
hard
to
determine
which
one
is
the
best.
When
comparing
Keeper
and
KeePass,
we
considered
factors
such
as
security,
ease
of
use,
portability
and
value.
We
scored
each
product
using
an
internal
algorithm.
The
scoring
was
based
on
the
products
individually
and
in
relation
to
other
password
managers.
Should
your
organization
use
Keeper
or
KeePass?
Overall,
Keeper
outperforms
KeePass
in
many
categories.
It
offers
more
features
and
stronger
security
while
being
easier
to
use.
However,
you
shouldn’t
automatically
discount
KeePass.
It’s
a
free
service
with
no
reported
history
of
data
breaches.
Its
functionality
can
be
increased
through
the
use
of
plugins.
Still,
KeePass
isn’t
user-friendly.
If
you’re
not
tech-savvy
or
willing
to
play
around
with
the
system,
it
might
be
hard
to
configure.
Ultimately,
it
will
be
up
to
you
to
decide
which
password
manager
is
best
for
your
needs.
It’s
been
a
huge
year
for
projectors
so
far
–
with
high-quality
beamers
arriving
from
the
likes
of
LG,
Samsung,
BenQ,
and
more.
But
as
we
hit
the
halfway
point
of
2024,
it’s
time
to
assess
the
changes
we’ve
seen
in
the
projector
market,
as
well
as
any
rumors
and
announcements
for
the
second
half
of
the
year.
Projectors
are
changing;
whereas
they
were
once
a
niche
TV
alternative,
they’re
now
a
serious
replacement
for
a
TV
setup,
whether
you’re
a
committed
cinephile
with
a
dedicated
home
cinema
room
and
projection
screen,
or
a
camper
who’s
looking
for
an
easy
way
to
watch
movies.
And
the
slate
of
2024
models
is
showing
that
the
traditional
benefits
of
most
projectors
(flexibility,
scalability,
portability)
are
improving
while
the
common
downsides
(low
brightness,
limited
blacks)
are
farther
away
than
ever.
Here’s
a
quick
overview
of
the
excellent
projectors
we’ve
seen
launch
in
2024
so
far,
and
a
glimpse
of
what
might
be
coming
next.
Projectors
in
2024:
what
have
been
the
biggest
launches
so
far
this
year?
The
Samsung
The
Freestyle
2nd
Gen
–
side-panel
connections
include
one
HDMI
with
eARC
and
a
USB-C
port
for
power
(Image
credit:
Future)
Our
guide
to
the
best
portable
projectors
has
been
given
a
serious
shakeup
in
2024.
This
year
has
seen
a
flood
of
excellent
4K
projectors
with
a
portable
mindset
–
ensuring
that
shoppers
don’t
need
to
choose
between
flexibility
and
picture
quality
–
to
the
extent
that
in
January
we
wrote
that
it
could
be
“the
end
of
home
theater
as
we
know
it“.
We’ve
seen
a
second-gen
Samsung
Freestyle,
an
$800
/
£650
follow-up
to
the
2022
original
that
was
already
one
of
our
favorite
portable
projectors.
It
brought
improved
support
for
Xbox
and
Nvidia
cloud-based
gaming
services,
as
well
as
the
option
to
install
it
in
a
ceiling
light
socket.
Our
Samsung
The
Freestyle
2nd
Gen
review
noted
that
its
brightness
(230
lumens)
and
HD
resolution
leave
a
little
to
be
desired,
but
it’s
still
a
fantastic
option
for
those
after
a
smart
projector
with
a
great
interface,
30-100
inch
projection
and
the
ability
to
easily
move
images
around.
Sign
up
for
breaking
news,
reviews,
opinion,
top
tech
deals,
and
more.
The
LG
Cinebeam
Q
mashes
up
CineBeam
picture
excellence
with
portable
projection.
(Image
credit:
Future)
But
LG
is
the
major
player
that’s
brought
its
exceptional
CineBeam
range
to
the
portable
market
with
the
stylish
CineBeam
Q
(above),
which
achieves
4K
resolution
and
500
lumens
brightness
as
well
as
the
excellent
webOS
streaming
platform
from
high-end
LG
TVs.
At
$1,299
/
£1,299
/
AU$2,499,
it
prices
out
the
more
budget
Samsung
Freestyle,
but
with
a
4.5/5
rating
in
our
LG
CineBeam
Q
review,
it’s
well
worth
the
upgrade.
And
for
those
after
a
truly
bright
experience,
the
JMGO
N1S
Ultra
4K
is
another
new
portable
projector
with
Ultra
HD
resolution
and
up
to
3000
ANSI
lumens,
alongside
a
brilliantly
compact
design
and
sturdy
gimbal
for
tilting
and
rotating
the
projection
with
pinpoint
accuracy.
(Image
credit:
Future)
There
are
plenty
of
new
advancements
for
fixed-position
projectors,
too.
The
XGIMI
Horizon
Ultra
(above)
is
the
first
long-throw
projector
that
supports
Dolby
Vision,
the
dynamic
HDR
format
that
tweaks
color,
contrast
and
bright
highlights
on
the
fly
for
a
more
vivid,
true-to-life
viewing
experience
–
and
one
that
counters
the
assumption
that
projectors
are
condemned
to
produce
dim
images
and
struggle
with
dark
scenes.
In
our
XGIMI
Horizon
Ultra
review
we
praised
the
2,300
lumens
output
and
wrote
that
“the
blacks
are
deep
and
HDR
performance
brilliant,
with
great
brightness
even
in
well-lit
conditions.”
At
$1,699
/
£1,749
/
AU$3,499,
the
XGIMI
Horizon
Ultra
is
still
far
cheaper
than
many
of
the
premium
projectors
we
review,
and
it’s
proof
that,
in
2024,
even
mid-range
options
are
managing
to
be
competitive
on
lots
of
the
most
important
metrics.
Projectors
in
2024:
what
launches
are
we
expecting
during
the
rest
of
the
year?
Samsung
The
Premiere
8K
is
yet
to
get
a
firm
release
date,
but
could
well
launch
before
2024
is
out.
(Image
credit:
Future)
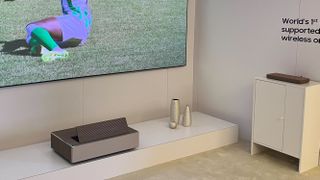
The
main
absence
from
2024’s
projector
lineup
so
far
is
Samsung’s
The
Premiere
8K,
which
was
shown
off
at
CES
2024
(and
CES
2023
before
that),
but
has
yet
to
officially
the
market,
with
no
firm
release
date
in
sight.
This
is
the
first
ever
wireless
8K
projector,
for
incredible
8K
resolution
images,
4000
lumens,
and
up
to
150-inch
projection
with
a
wire-free
beamer
and
ultra
short-throw
technology.
You
will
need
Samsung’s
One
Connect
Box
to
wirelessly
transmit
8K
video
to
the
projector,
but
it
does
mean
you
can
keep
the
additional
hardware
and
cables
out
of
view
on
a
cozy
movie
night.
A
built-in
8.2.2
channel
Dolby
Atmos
sound
system
doesn’t
hurt,
either,
and
marks
a
notable
upgrade
over
the
high-end
Samsung
Premiere
LSP9T,
which
is
currently
the
best
4K
projector
we’d
recommend
for
sound
quality.
As
an
alternative
for
the
best
8K
TVs,
the
incoming
Premiere
8K
is
an
interesting
proposition.
While
the
present
for
projectors
seems
to
be
in
bringing
high-end
specs
to
portable
models,
the
future
seems
to
be
(somewhat
similarly)
in
bringing
wireless
tech
to
the
high
end
–
and
the
winners
are
most
certainly
us.
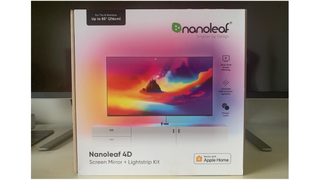
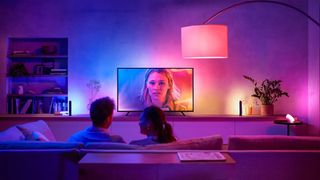
Nanoleaf’s
4D
TV-syncing
strip
lights
are
a
first
for
the
brand,
which
is
known
best
for
making
some
of
the
best
smart
lights
available.
With
Nanoleaf
4D,
the
brand
has
easily
accomplished
one
of
the
best
Ambilight
alternatives
and
created
some
serious
competition
for
established
brands
in
the
space
such
as
Philips
Hue
and
Govee.
The
set
is
available
in
two
sizes,
one
for
screens
up
to
65
inches
and
the
other
for
models
up
to
85
inches,
and
come
in
at
a
fairly
affordable
price
of
$99
/
£89
/
AU$189
and
$119
/
£119
/
AU$229
respectively.
Out
of
the
box,
the
Nanoleaf
4D
kit
consists
of
an
LED
light
strip
that
is
attached
to
the
back
of
the
screen
and
plugged
into
a
control
box,
which
in
turn
connects
to
a
camera
that
detects
the
colors
displayed
on
the
screen.
The
kit
illuminates
the
LEDs
to
match
the
picture
on
your
screen,
throwing
the
colors
onto
the
wall
behind
the
screen
for
a
pleasing
synchronized
glow
around
the
screen.
The
camera
can
either
be
mounted
atop
the
TV
with
the
included
armature,
or
placed
on
your
TV
table
using
its
built-in
stand,
and
those
concerned
about
prying
digital
eyes
around
their
home
will
be
pleased
to
learn
that
the
camera
also
comes
with
a
magnetic
privacy
cover.
(Image
credit:
Future)
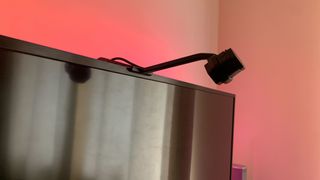
One
of
the
slight
niggles
I
found
when
setting
up
the
lights
concerned
how
the
cables
that
connect
the
lights
and
camera
to
the
controls
are
positioned.
The
rather
vague
instructions
in
the
handbook
encourage
you
to
begin
your
light
strip
placement
in
the
bottom
right-hand
corner
of
your
screen,
meaning
the
wire
for
the
lights
trails
from
that
corner,
while
the
camera
cable
falls
centrally.
This
leaves
you
with
a
choice
of
either
bending
and
sticking
the
light
strip
wire
or
having
the
control
sit
somewhere
near
the
right-hand
side
of
your
screen,
lest
you
run
out
of
wire
length
to
play
with.
All
in
all,
although
not
a
major
issue,
I
value
a
neat
home
entertainment
setup
and
this
doesn’t
necessarily
facilitate
that.
Installation
is
otherwise
very
straightforward,
although
you
will
need
to
remove
your
television
from
the
wall
to
fit
the
lightstrip,
and
potentially
need
a
second
pair
of
hands
if
you’re
a
real
perfectionist.
I
cheated
as
my
test
screen
is
on
a
stand!
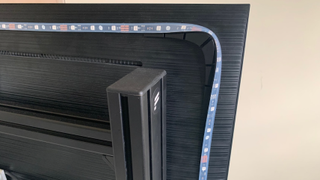
The
kit
comes
supplied
with
corner
mounting
blocks
which
allow
the
strip
to
curve
around
the
corners
(rather
than
creating
a
loop
out
of
the
strip
which
would
create
problems
in
accurately
matching
the
colours
to
the
screen.)
(Image
credit:
Future)
There
are
10
color
zones
per
meter
and
30
LEDs
per
meter,
and
the
strip
can
be
cut
to
length
at
specific
10-centimetre
intervals.
This
does
mean
you
might
end
up
with
a
gap
or
excess
of
the
strip
when
they
meet
at
the
end,
but
a
little
trial
and
error
with
placement
before
sticking
anything
on
will
minimize
this.
Once
that’s
done,
simply
peel
off
the
tape
backing
and
stick
that
strip
down,
and
you’re
all
set.
The
strip
does
tend
to
peel
away
from
the
back
of
the
screen
where
the
two
ends
meet,
but
that’s
easily
resolved
by
applying
some
more
double-sided
sticky
tape.
The
Nanoleaf
app
is
nicely
laid
out
and
works
well
most
of
the
time,
but
can
occasionally
crash.
Whilst
I
appreciate
that
all
software
has
bugs,
some
sort
of
an
error
message
would
be
nice.
Having
said
that,
the
things
that
you
can
do
with
this
software
and
the
kit
impressed
me;
the
Nanoleaf
4D
does
all
of
the
usual
colored
lighting
tricks
that
LED
strips
do.
But
let’s
face
it,
screen
synchronization
is
what
we’re
here
for.
(Image
credit:
Future)
The
app
guides
you
through
mapping
out
your
TV
lights,
and
once
you’re
set
up,
you
can
create
your
own
scenes,
or
you
can
use
the
Magic
Scenes
feature
to
create
a
palette
based
on
a
mood
or
keywords
(although
I
found
that
the
latter
favored
washed-out
hues).
You
can
choose
between
four
settings
(or
dimensions,
between
1D
and
4D),
which
range
from
an
ambient
white
glow
to
the
aforementioned
screen-matching
lights
akin
to
the
gold
standard
Ambilight-style
experience.
It’s
a
little
tricky
to
find
clear
guidance
on
what
each
of
the
dimensions
does,
so
here
is
my
take
on
it.
1D:
White
light
that’s
well
suited
to
documentaries
and
general
viewing
2D:
Block
color
that’s
great
for
ambiance,
representing
an
average
of
the
color
displayed
on-screen
3D:
Splashes
of
color
reflective
of
on-screen
action,
but
not
extending
the
screen
4D:
Colors
extend
from
the
edges
of
the
screen
for
full
immersion
You
can
change
the
color
settings
by
cycling
through
the
controls
or
via
the
app.
Nanoleaf
4D
features
the
same
sound-reactive
functionality
boasted
by
its
smart
light
siblings,
and
as
a
bonus,
responds
to
sound
far
better
than
the
Nanoleaf
Smart
Holiday
String
Lights
I
reviewed
last
month.
Once
I
had
finished
playing
with
all
of
the
settings
I
played
a
few
games
and
films
and
noticed
that
one
side
of
the
screen
was
not
displaying
the
screen
colors
correctly.
Further
investigation
revealed
the
problem;
I
needed
to
close
a
white
door
that
was
being
reflected
on
the
screen.
You
have
a
choice:
either
be
mindful
of
the
lighting
and
reflective
objects
in
the
room
or
spend
between
4
or
5
times
as
much
on
a
Philips
Hue
system
for
its
HDMI
linking.
Image
1
of
8
The
only
feature
I
found
myself
missing
is
a
perennial
issue
for
non-HDMI
smart
screen
lights
– automatic
screen
detection.
Call
me
lazy,
but
I’d
prefer
my
lights
to
come
on
when
they
detect
on-screen
activity,
rather
than
requiring
me
to
use
the
app
or
physical
control.
Overall,
I’d
say
the
Nanoleaf
4D
screen
mirror
and
lightstrip
kit
is
a
great
low-cost
alternative
to
the
Philips
Hue
system
that
just
edges
out
the
other
low-cost
alternatives
in
several
areas;
it’s
easy
to
install,
well-designed
and
the
results
can
be
spectacular.
This
thing
is
so
versatile
and
colorful
that
it
made
me
want
to
get
some
Nanoleaf
wall
tiles
to
test
their
claim
of
the
4D’s
ability
to
“extend
the
screen
sync
effects
across
50+
Nanoleaf
RGB
lights”.
Look,
somebody’s
got
to
do
it…
Nanoleaf
4D
screen
mirror
and
lightstrip
kit:
price
and
availability
List
price:
TVs
&
monitors
up
to
65-inch:
$99
/
£89.99 /
AU$189.99
TVs
&
monitors
up
to
85-inch:
$119
/£119.99 /
AU$229.99
Camera
only
kit:
$79.99
/
£69.99 /
AU$149.99
The
Nanoleaf
4D
screen
mirror
and
lightstrip
Kit
are
available
directly
from
the
Nanoleaf
website,
starting
at
$79.99
/
$69.99
/
AU$149.99
for
the
camera-only
kit.
You
can
also
buy
the
camera-only
kit
from
Amazon
in
the
UK
but
curiously,
not
the
full
kit
–
however
in
the
US,
you
can
buy
all
three
packages
on
Amazon.
The
camera-only
kit
is
a
great
cost-effective
option
which
can
be
used
with
the
Nanoleaf
RGB
LED
light
strip
or
any
RGB
light
strip
that
has
USB-C
connection.
Value-wise,
the
Nanoleaf
4D
is
undoubtedly
one
of
the
best,
if
not
the
best
value
smart
TV
lights
–
the
Philips
Hue
alternative
for
75-inch
and
over
TVs
is
nearly
$100
/
£100
/
AU$300
more
expensive
at
$249.99
/
£209.99
/
AU$509.95,
and
you’ll
need
a
Philips
Hu
bridge
if
you
don’t
already
have
one.
Govee’s
lights
sit
squarely
in
between
but
don’t
offer
such
consistency
or
smooth
light
performance
as
Nanoleaf.
(Image
credit:
Future)
Nanoleaf
4D
screen
mirror
and
lightstrip
kit
review:
Specs
Control
via
the
Nanoleaf
App
(Android
&
iOS)
for
mobile/tablet
or
the
Nanoleaf
Desktop
App
(Windows
&
Mac).
Bluetooth,
Smart
App
Hue
Sync
Box
Compatibility
Apple
Home,
Amazon
Alexa,
Google
Home,
IFTTT,
SmartThings,
Razer
Chroma
Alexa,
Google
Home
Alexa,
Google
Assistant
and
Apple
HomeKit
Colors
16+
million
Unknown
16+
million
Nanoleaf
4D
screen
mirror
and
lightstrip
kit
review:
How
I
tested
I
installed
the
Nanoleaf
application
and
added
the
Nanoleaf
4D
screen
mirror
and
lightstrip
Kit
to
Apple
HomeKit
I
tested
all
of
the
modes
and
scenes
against
different
types
of
content
(i.e.
films,
TV
programs,
Games)
and
resolutions
I
tested
each
claimed
feature
e.g.
“Reacts
to
music”
where
possible
I
tested
the
kit
under
various
lighting
conditions.
I
had
already
tested
a
pre-release
version
of
this
kit
last
year
which
was
unfortunately
defective
and
a
very
frustrating
experience.
The
days
that
I
spent
trying
to
get
it
to
work
reliably
were
not
wasted
though
as
it
gave
me
a
good
understanding
of
how
the
thing
works
and
how
it
has
been
improved.
I
was
pleased
to
be
able
to
make
use
of
scenes
in
Apple
Homekit
which
I
could
not
get
to
work
when
I
tested
the
Nanoleaf
Smart
Holiday
String
Lights
last
month. I
switched
off
Bluetooth
on
my
phone
and
ran
all
of
the
tests
again
to
find
out
if
there
was
any
function
that
used
Bluetooth
and
everything
behaved
normally.
The
room
I
use
to
test
things
is
the
worst-case
scenario
for
the
Nanoleaf
4D
screen
mirror
and
lightstrip
Kit
as
it
is
almost
completely
white.
Everything
gets
reflected
on
the
screen,
especially
in
daylight
which
affects
the
colors
that
the
camera
detects.
I
was
pleasantly
surprised
during
testing
to
find
that
some
of
the
reflection
problems
could
be
dialed
out
using
a
custom
vibrancy
set
which
allows
you
to
change
the
values
for
Dynamic
range,
saturation,
and
white
balance.
You
can’t
beat
the
impact
of
a
proper
home
theater
set
up
on
your
movies
and
boxsets.
Not
only
will
it
help
you
to
feel
fully
immersed
in
whatever
you’re
watching,
it’ll
also
get
you
much
closer
to
the
director’s
original
intent.
Tech
Resolutions
(Image
credit:
Future)
This
is
part
of
a
series
of
articles
exploring
all
the
ways
we’re
using
tech
to
thrive
in
2024.
Read
them
all
here.
Now
we’re
no
AV
snobs
here
at
TechRadar.
Sure,
we
love
a
high-end
set
up
as
much
as
the
next
home
theater
fan,
but
home
cinema
is
what
you
make
it
–
so
whether
that’s
a
full
surround
sound
set
up
and
flagship
telly
or
a
soundbar
and
something
more
mid-range,
there
will
be
things
you
can
do
to
make
sure
your
system
is
performing
at
its
best.
From
simple
settings
tweaks
to
ways
that’ll
help
your
products
work
better
in
your
room,
read
on
for
our
top
tips
on
getting
the
most
out
of
your
home
theater
set
up
in
2024.
Tip
1:
Perfect
your
settings
(Image
credit:
Future)
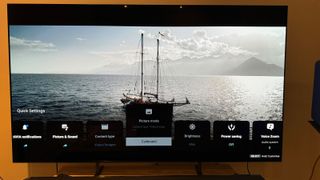
3
TV
settings
to
turn
off
for
a
better
picture
1.
Energy-saving
or
eco
mode
While
eco
modes
are
there
for
good
reason,
the
fact
remains
that
they
do
absolutely
nothing
for
your
TV’s
picture
quality,
and
will
push
down
brightness
that
you
may
prefer
to
hang
on
to.
Look
out
for
Eco,
Energy
or
Power
saving
settings
in
the
menu,
occasionally
highlighted
by
a
leaf
icon,
and
switch
off
when
you
want
picture
performance
to
be
its
best.
2.
Edge
enhancement
or
sharpness
control
While
having
sharper
edges
to
your
images
might
sound
good,
added
processing
pretty
much
always
takes
away
more
than
it
provides.
By
switching
this
on
or
upping
the
sharpness
in
the
settings,
outlines
will
be
unnaturally
accentuated,
and
true
fine
detail
will
be
masked.
You
might
even
notice
a
sort
of
halo
appearing
around
the
edge
of
objects.
Avoid
like
the
plague.
3.
Motion
smoothing
or
judder
reduction
Another
setting
that
sounds
helpful
that
usually
creates
more
issues
that
it
solves.
In
trying
to
reduce
the
stuttering
that
can
occur
in
movement
like
camera
pans
—
particularly
with
24Hz
film
content
—
this
technology
uses
frame
interpolation
to
insert
made-up
frames
to
smooth
it
all
out.
The
result
is
an
unnatural-looking
“soap
opera
effect”,
that
makes
movies
in
particular
look
plain
weird.
It’s
fair
to
say
that
TV
menus
can
be
pretty
daunting,
but
if
you
haven’t
delved
into
them
since
you
fished
your
TV
out
of
its
box,
we
would
really
encourage
you
to
do
so.
A
lot
of
manufacturers
have
tried
to
help
here,
by
simplifying
the
options
and
offering
more
visual
ways
of
understanding
what
changing
a
setting
might
do.
That’s
a
good
starting
point,
but
there
will
likely
be
other
settings
hiding
in
the
full
menu
that
are
well
worth
your
attention.
For
the
most
accurate
picture,
you
will
either
want
to
look
for
Filmmaker
Mode
on
more
recent
TVs,
or
Cinema/Movie
mode
elsewhere.
To
many
people,
who
are
used
to
poorly
set
up
TVs,
this
can
look
quite
warm
to
begin
with,
and
sometimes
lacking
in
‘punch’
too.
Stick
with
it
a
while,
and
allow
your
eyes
to
adjust
to
the
new
picture.
If
you
really
can’t
enjoy
it
as
it
is,
steer
well
clear
of
Vivid
or
Dynamic
settings
and
give
the
Standard
mode
a
whirl.
This
will
usually
add
the
punch
that
some
people
miss
without
being
overly
saturated
and
cartoonish.
Just
be
aware
that
pictures
will
be
cooler
in
tone
than
is
considered
accurate,
and
you
may
sacrifice
things
like
black
level
and
contrast
performance
for
that
brighter
overall
picture.
Sign
up
for
breaking
news,
reviews,
opinion,
top
tech
deals,
and
more.
Once
you
get
past
the
picture
mode,
cast
your
eye
over
the
full
settings
to
ensure
everything
is
configured
well.
As
a
rule,
we
would
suggest
turning
off
(or
to
low/minimum)
all
additional
processing,
and
then
slowly
adding
it
back
in
if
you
spot
any
issues
you
think
it
could
fix.
In
particular,
switch
off
any
eco
modes
for
the
best
picture
performance,
and
pay
close
attention
to
motion
processing,
which
will
often
be
ramped
up
unnecessarily.
The
result
is
an
overly
smooth
picture
with
a
loss
of
detail
–
something
that
is
called
the
“soap
opera
effect”.
In
fact,
motion
processing
can
sometimes
do
more
harm
than
good,
so
don’t
be
afraid
to
turn
it
off
completely
if
you
spot
distracting
wiggly
lines
around
moving
objects.
Tip
2:
Consider
speaker
placement
(Image
credit:
Bowers
&
Wilkins)
Whether
you’ve
got
a
proper
surround
sound
setup,
a
soundbar
and
sub,
or
even
wireless
satellite
speakers,
where
you
have
your
speakers
in
your
room
can
make
all
the
difference
to
how
they
sound.
While
it
can
be
tempting
to
tuck
speakers
away
to
keep
things
looking
neat,
they
generally
need
a
bit
of
space
to
sound
their
best.
Place
them
too
close
to
a
rear
wall
and
bass
can
be
overemphasized
to
a
point
of
boominess.
Look
up
the
manufacturer’s
recommendations
for
how
far
from
a
back
and
side
wall
they
should
be
placed
–
a
general
rule
of
thumb
is
2-3
feet.
Pull
them
out
of
the
corners
and
you’ll
hear
the
sound
open
up
immediately.
That’s
also
the
case
with
a
subwoofer.
Tucking
an
ugly
black
box
into
a
corner
may
be
preferable
from
an
aesthetics
perspective,
but
you
will
get
the
best
performance
if
it
is
in
line
with
your
front
speakers,
so
make
room
for
it.
Haven’t
got
a
sub?
Buy
one,
it’ll
throw
some
much-needed
welly
behind
those
all-important
movie
action
scenes.
A
lot
of
soundbars
don’t
deal
too
well
with
being
tucked
away
in
TV
cabinets
either
–
particularly
those
with
upwards-firing
drivers
for
Dolby
Atmos
sound.
For
this
reason,
Atmos-capable
bars
in
particular
should
be
placed
on
top
of
any
TV
rack
with
no
restriction,
so
you
can
hear
the
spatial
sound
effect
in
full.
Finally,
if
you
have
standmount
speakers
or
wireless
satellites
sitting
on
low
TV
racks
and
tables,
consider
investing
in
proper
speaker
stands.
These
will
lift
your
speakers
to
ear
level,
which
will
ensure
you
hear
them
at
their
very
best.
Once
there,
it’s
also
worth
experimenting
with
“toeing
in”,
or
angling
your
speakers
inwards
—
just
slightly
—
towards
your
main
seated
position.
It
won’t
be
necessary
for
all
rooms
or
all
speakers,
but
it
can
help
to
improve
focus
and
imaging.
Check
your
speakers’
user
manual
for
any
manufacturer
recommendations
too.
Tip
3:
Rearrange
your
room
(Image
credit:
Philips)
How
much
you
can
lug
furniture
around
to
optimize
your
home
theater
setup
will
be
somewhat
down
to
the
size
and
shape
of
your
room.
But
there
are
a
few
things
you
could
consider
if
you
want
to
get
the
best
from
your
kit.
Firstly,
bringing
your
sofa
away
from
any
back
wall
will
help
with
surround
sound
setups.
If
you
can
imagine
drawing
a
line
between
your
speakers,
they
should
make
a
circle,
with
your
viewing
position
at
the
center
—
sitting
equidistant
from
each
one
if
at
all
possible.
If
not,
your
AV
receiver
will
help
to
account
for
this
in
its
calibration,
but
not
having
a
rear
speaking
blasting
directly
into
your
ear
at
close
range
is
the
aim
here.
The
sofa
should
ideally
be
directly
in
front
of
a
TV
too,
with
as
few
side-on
viewing
positions
as
possible.
Even
the
very
best
TVs
can
suffer
with
a
loss
of
picture
saturation
and
black
level
off-axis,
so
ensure
as
many
people
as
possible
can
view
it
from
front
on.
This
also
matters
when
it
comes
to
wall
mounting
your
TV,
which
should
be
done
at
eye
level.
The
trend
for
placing
TVs
above
fireplaces
has
done
nothing
for
neck
aches
or
picture
quality,
so
make
sure
you
mount
it
lower
if
you
want
your
TV
looking
its
best.
If
there
really
is
no
other
place
for
it,
consider
adding
a
tilt
to
your
mount,
to
improve
the
viewing
angle
from
your
sitting
position
and
relieving
that
front-row-at-the-cinema
feeling
somewhat.
These
things
matter
more
than
being
a
specific
distance
from
your
TV,
these
days.
As
long
as
your
TV
is
a
4K
set,
you
have
much
more
flexibility
with
how
far
you
sit
from
it
than
you
did
with
full
HD,
as
the
pixels
are
so
small
they’re
almost
unnoticeable.
Still,
a
good
rule
of
thumb
is
to
account
for
a
viewing
distance
of
1
to
1.5
times
the
size
of
your
screen
if
you
can.
Finally,
moving
a
lamp
or
lighting
source
behind
your
TV
will
create
something
called
bias
lighting.
This
helps
to
reduce
eye
fatigue
when
watching
TV
in
low
light,
without
it
being
too
distracting
or
creating
reflections
—
just
one
of
the
reasons
we
love
Ambilight
TVs
so
much.
Tip
4:
Run
your
calibration
(Image
credit:
Denon)
Now
that
you’ve
moved
things
around,
you
will
want
to
re-run
the
auto-calibration
process
built
into
your
AV
receiver
or
soundbar
—
something
you’ll
want
to
do
any
time
you
make
changes
in
your
room
or
speakers.
And
if
you
didn’t
do
this
in
the
first
place,
then
it’s
well
overdue.
This
process
will
usually
fire
a
series
of
strange-sounding
tones
into
the
room,
to
understand
its
size
and
shape,
and
how
sound
reacts
within
it.
More
thorough
setups
will
use
a
calibration
mic
as
well,
to
pinpoint
the
main
sitting
position,
and
how
this
relates
to
any
speakers
in
the
room.
This
is
usually
over
and
done
with
in
a
matter
of
minutes,
with
automatic
tweaks
being
made
to
your
kit
to
improve
the
sound
afterwards.
Now
your
home
cinema
setup
is
optimized,
it
will
be
ready
to
perform
to
the
very
best
of
its
abilities
at
your
next
movie
night.
What
a
way
to
kick
off
2024.
Sony
consolidated
its
TV
lineup
for
2024
with
fewer
models
and
a
naming
convention
that
was
easier
to
follow.
Perhaps
what
was
most
interesting
about
this
move
was
that
a
mini-LED
TV
–
the
Bravia
9
–
was
spearheading
the
charge
as
the
new
flagship
Sony
TV,
effectively
demoting
OLED
to
the
next
rung
down.
Enter
the
Bravia
8,
a
pure
WOLED
screen
that
replaces
the
excellent
A80L.
If
you
want
the
absolute
pinnacle
of
Sony’s
OLED
prowess,
the
A95L
released
in
2023
is
still
available
to
buy,
complete
with
its
much
higher
price
tag.
But
you
may
not
feel
the
need
to
stretch
that
high,
since
the
Bravia
8
(on
review
here)
takes
the
A80L’s
winning
formula
and
makes
a
few
notable
improvements.
Sony
claims
this
latest
mid-range
OLED
model
is
brighter
than
its
predecessor,
yet
manages
to
do
without
some
of
the
brightness-boosting
tech
we’ve
seen
applied
to
other
OLED
TVs
in
the
past
couple
of
years.
Instead,
the
Bravia
8
relies
on
Sony’s
new
Bravia
XR
processor
to
do
the
proverbial
heavy
lifting
and
stake
a
claim
as
one
of
the
best
OLED
TVs
you
can
buy.
This
processor
harnesses
the
power
of
AI
to
better
understand
the
image
on
screen
and
make
adjustments
to
ensure
it’s
delivered
at
its
absolute
best.
And
it
does
(for
the
most
part)
improve
over
the
A80L
where
brightness
is
concerned
to
deliver
a
gorgeous
picture
no
matter
if
you’re
watching
TV
or
movies,
or
playing
games.
Sony’s
Acoustic
Surface+
audio
system
makes
a
return,
maintaining
the
brand’s
position
as
being
one
of
the
best
TVs
for
sound
thanks
to
actuators
placed
behind
the
screen
to
physically
vibrate
it
–
a
feature
that’s
exclusive
to
Sony
TVs.
It
means
the
Bravia
8
can
go
loud,
is
dynamically
impressive
and
is
capable
of
placing
objects
within
a
soundfield
better
than
many
other
flat-screen
TVs.
When
connected
to
one
of
Sony’s
latest
Bravia
Theater
soundbars
–
the
Theater
Bar
8
is
a
natural
pairing
–
an
Acoustic
Center
Sync
feature
can
be
used
to
turn
the
TV
into
a
dedicated
center
channel
speaker.
The
Bravia
8
is
a
great
option
for
gamers
thanks
to
its
support
of
all
the
major
gaming
features,
including
4K
support
at
120Hz,
an
auto
low-latency
mode
(ALLM),
variable
refresh
rate
(VRR)
and
Sony’s
‘Perfect
for
PS5’
tech
that
automatically
adjusts
picture
settings
to
their
optimum
–
for
both
games
and
movies
–
when
a
PlayStation
5
console
is
detected
in
either
of
its
two
HDMI
2.1
inputs.
Yep,
the
Bravia
8
still
only
supports
4K/120Hz
across
two
of
its
four
HDMI
inputs
and
you’ll
need
to
use
the
one
marked
‘eARC’
if
you
plan
to
connect
an
external
soundbar.
Sony
isn’t
alone
in
offering
support
across
only
half
of
its
TV’s
inputs,
but
it’s
a
shame
that
it’s
still
happening
in
2024.
The
main
caveat
at
the
time
of
writing,
however,
is
that
in
some
territories
the
A80L
is
still
readily
available
and
for
a
more
affordable
price.
While
there’s
no
doubt
the
Bravia
8
makes
improvements
over
its
predecessor,
some
customers
either
won’t
notice,
or
won’t
care
for
the
admittedly
incremental
upgrades.
The
Bravia
8
is
indeed
Sony’s
best
mid-range
OLED,
but
it’s
not
quite
the
generational
leap
we’ve
seen
between
some
other
TV
series
–
see
the
improvements
Samsung
makes
each
year
with
its
S95
QD-OLED
series
as
an
example.
Sony
Bravia
8
review:
Price
and
release
date
Announced
in
April
2024
for
July
2024
launch
Pricing
starts
at
$2,799
/
£2,699
/
AU$3,495
(55-inch)
No
83-inch
model
in
2024
The
Sony
Bravia
8
was
announced
in
April
2024
and
released
in
July
2024
in
55-,
65-
and
77-inch
sizes.
The
A80L
predecessor
was
available
in
a
larger
83-inch
size,
but
that
has
seemingly
been
dropped
this
time
around.
Pricing
has
remained
relatively
consistent
compared
to
the
A80L,
with
the
65-inch
model
I’ve
reviewed
setting
you
back
$2,799
/
£2,699
/
AU$4,495.
That’s
$200
/
£200
more
expensive
than
the
A80L
in
the
US
and
UK
and
the
same
as
the
A80L’s
launch
price
in
Australia.
Since
launch,
we’ve
already
seen
small
price
drops
in
all
markets,
so
it’s
unlikely
you
would
need
to
pay
the
full
suggested
retail
price
if
you
decide
to
buy.
The
55-inch
Bravia
8
has
been
priced
at
$2,799
/
£2,699
/
AU$3,495
while
the
range-topping
77-inch
retails
for
$3,899
/
£3,499
/
AU$6,995.
The
Sony
Bravia
8’s
pricing
once
again
puts
it
squarely
up
against
the
LG
C4
(the
A80L
and
LG
C3
were
similarly
priced
in
2023)
and
in
most
cases,
LG’s
mid-range
OLED
comes
out
the
more
affordable,
and
it’s
available
in
a
greater
variety
of
sizes.
LG’s
telly
offers
full
4K/120Hz
support
across
all
four
HDMI
inputs,
making
it
a
better
prospect
for
gamers
and
those
with
multiple
external
devices,
but
as
was
the
case
in
2023,
LG’s
TV
has
weaker
built-in
sound.
Sony
Bravia
8
review:
Specs
Swipe
to
scroll
horizontally
Screen
type:
OLED
Refresh
rate:
120Hz
HDR
support:
HDR10,
HLG,
Dolby
Vision
Audio
support:
Dolby
Atmos,
DTS
Smart
TV:
Google
TV
HDMI
ports:
4
(2x
HDMI
2.1)
Sony
Bravia
8
review:
Benchmark
results
Sony
Bravia
8
review:
Features
New
Bravia
XR
processor
Voice
Zoom
3
for
improved
vocal
clarity
New
eco-friendly
remote
control
The
Sony
Bravia
8
uses
a
standard
WOLED
panel
as
found
in
its
A80L
predecessor,
but
the
key
metric
Sony
is
keen
to
advertise
with
the
Bravia
8
is
that
it’s
capable
of
going
10%
brighter,
thanks
to
the
aforementioned
XR
Processor.
There’s
no
Micro
Lens
Array
(MLA)
or
QD-OLED
tech
to
be
found
here,
so
it
is
strictly
the
power
of
the
new
chip
and
its
ability
to
better
understand
how
to
manipulate
lighting
that
is
going
to
result
in
that
brightness
boost.
Indeed,
Sony
says
its
new
XR
chip
can
better
detect
objects
in
scenes
with
greater
accuracy
and
will
then
automatically
optimize
the
picture
to
get
as
close
to
the
creator’s
intentions
as
possible.
Also
new
in
the
Bravia
8
is
a
dedicated
Prime
Video
Calibrated
Mode
(also
a
feature
of
the
flagship
Bravia
9)
which
will
automatically
adjust
picture
settings
when
you’re
watching
a
raft
of
content
on
Amazon’s
streaming
service.
This
is
in
addition
to
the
Netflix
Calibrated
Mode
and
Sony
Pictures
Core
Calibrated
Mode,
both
of
which
work
in
similar
ways
and
have
been
carried
over
from
the
outgoing
A80L.
The
latest
iteration
of
Sony’s
Eco
Dashboard
gives
clear
insights
into
how
much
energy
the
TV
is
using.
(Image
credit:
Future
/
Max
Langridge)
Voice
Zoom
3,
also
taken
from
the
high-end
Bravia
9,
is
integrated
into
the
Bravia
8,
which
can
be
used
to
boost
(or
decrease)
voices
and
dialogue
in
whatever
content
you’re
watching.
Elsewhere,
there
is
little
to
separate
the
Bravia
8
and
A80L
from
a
features
perspective.
Both
support
Dolby
Vision,
HDR10
and
HLG
HDR
formats
(no
HDR10+)
and
the
Bravia
8
once
again
gets
Google
TV
as
the
operating
system
of
choice.
Sony’s
second
iteration
of
its
Eco
Dashboard
makes
an
appearance
too,
allowing
you
to
adjust
various
energy-saving
features
and
view
their
effects
in
a
neat
bar
graph-style
chart.
Sony
also
ships
the
Bravia
8
with
a
new
Eco
Remote
that
has
a
slight
speckled
appearance.
This
remote
is
made
from
80%
recycled
materials,
is
backlit
and
recharges
via
USB-C.
Features
score:
4.5
/
5
Sony
Bravia
8
review:
Picture
quality
Wonderfully
natural
colors
Slightly
increased
brightness
for
improved
HDR
performance
Performs
at
its
best
in
darker
rooms
Sony’s
claims
of
the
Bravia
8
benefitting
from
a
10%
brightness
increase
over
the
A80L
certainly
carry
some
weight,
with
its
latest
OLED
TV
recording
a
149.5
nits
measurement
in
HDR
Filmmaker
Mode
on
a
full
screen,
compared
to
the
A80L’s
139
nits
based
on
our
measurements.
(Image
credit:
Future
/
Max
Langridge)
There
are
noticeable
differences
in
the
10%
window
brightness
measurements
in
both
HDR
and
SDR
Standard
modes,
too.
HDR
Standard
returned
a
result
of
816.7
nits
on
the
Bravia
8
(compared
to
the
A80L’s
741
nits),
while
SDR
Standard
saw
the
Bravia
8
improve
upon
the
A80L’s
247
nits
with
a
measurement
of
287.9
nits.
Interestingly,
measurements
taken
for
SDR
content
in
Filmmaker
mode
(or
rather,
Sony’s
own
version
called
Professional)
returned
vastly
different
results
and
not
in
the
Bravia
8’s
favor,
with
a
measurement
of
99.4
nits
compared
to
the
A80L’s
224,
indicating
this
is
a
picture
mode
you’ll
want
to
avoid
when
watching
SDR
content.
Outside
of
this,
it
should
mean
the
Bravia
8
will
take
everything
that
we
loved
about
the
A80L
but
throws
in
a
helping
of
improved
contrast
and,
with
the
new
XR
Processor
acting
as
the
brains
of
the
operation,
finer
control
of
light
for
improved
HDR
performance.
As
for
color
performance,
the
Bravia
8
does
well
against
some
of
its
closest
competitors,
covering
99.1%
of
the
UHDA-P3
color
gamut
and
75%
BT.2020.
The
LG
C4,
by
comparison,
returned
results
of
98.7%
and
72.7%,
respectively.
For
my
real-world
performance
tests,
I
streamed
the
opening
fight
sequence
between
Ta
Lo
and
Xu
Wenwu
in
Shang-Chi
and
the
Legend
of
the
Ten
Rings
on
Disney
Plus
in
its
IMAX
Enhanced
version.
It’s
a
glorious
test
of
color
with
various
shades
of
green,
yellow
and
red
as
the
two
go
head-to-head
with
their
own
fighting
styles.
I
was
watching
in
a
dark
room
and
so
selected
the
Dolby
Vision
Bright
picture
setting,
which
increases
brightness
without
any
sacrifice
to
detail
and
found
the
Bravia
8
reproduced
this
scene
beautifully.
Dolby
Vision
Dark
was
a
little
too
dim
for
my
preference
in
this
case.
Sony’s
XR
Triluminos
Pro
technology,
which
aims
to
reproduce
natural
and
accurate
colors,
worked
to
full
effect,
with
the
greens
and
yellows
of
the
forest
setting
looking
incredibly
realistic
–
it
was
easy
to
notice
the
different
shades
depending
on
where
the
light
was
hitting
and
the
characters’
faces
were
clear
and
detailed.
The
Sony
Bravia
8
demonstrates
excellent
control
of
light
and
highlights
(Image
credit:
Future
/
Max
Langridge)
Even
the
rings
around
Xu
Wenwu’s
arms
gave
off
a
satisfying
blue
shine
as
they
were
powering
up
for
attack,
highlighting
the
Bravia
8’s
–
and
more
specifically,
the
XR
Contrast
Booster’s
–
ability
to
precisely
control
the
light.
What
makes
this
all
the
more
impressive
is
the
fact
that
there
is
no
MLA
technology
or
Quantum
Dot
layer,
but
instead
a
traditional
WOLED
panel.
After
we
meet
present-day
Shang
Chi
and
he’s
speaking
with
friends
in
a
dimly
lit
bar,
the
Sony
Bravia
8
flexes
its
muscles
with
regard
to
picking
out
detail
where
there’s
little
to
no
light.
His
dark
T-shirt
is
clearly
distinguishable
from
his
even
darker
cardigan,
while
the
stripes
on
his
female
friend’s
blazer
can
also
be
seen.
There’s
no
discernible
light
blooming
around
the
bright
table
lamps,
both
the
one
at
the
front
and
center
of
the
screen,
and
the
numerous
others
dotted
about
in
the
background.
The
Sony
Bravia
8
offers
the
option
to
switch
to
a
dedicated
‘calibrated’
mode
when
watching
content
on
Prime
Video
(as
above),
Netflix
or
Sony
Pictures
Core
(Image
credit:
Future
/
Max
Langridge)
An
Ultra
HD
stream
of
The
Ministry
of
Ungentlemanly
Warfare
on
Prime
Video
provided
a
good
opportunity
to
test
out
the
new
Prime
Video
Calibrated
Mode.
Switching
this
mode
on
and
off
is
as
simple
as
toggling
a
switch
in
the
picture
settings,
but
in
the
instance
for
this
particular
movie,
I
noticed
absolutely
no
difference
between
the
Calibrated
picture
settings
and
Sony’s
own
Professional
picture
mode
(the
brand’s
version
of
Filmmaker
mode).
This
could
potentially
be
because
the
Bravia
8
doesn’t
support
HDR10+,
which
Prime
Video
uses,
but
regardless,
in
either
mode,
I
was
presented
with
a
beautiful,
natural
image
with
great
depth.
I
compared
the
same
opening
scene
on
the
LG
G4
and,
while
the
better-specced
TV
did
have
more
refined
light
control,
it
wasn’t
quite
the
stark
difference
I
was
initially
expecting
–
which
is
kudos
to
Sony.
I
switched
the
overhead
lights
on
and
loaded
up
Kingdom
of
the
Planet
of
the
Apes
on
Disney
Plus
–
while
there
was
a
fair
amount
of
reflection
noticeable
in
the
opening,
very
dark
scene,
it
wasn’t
enough
to
distract
me
from
my
viewing.
And
that
viewing
was
glorious,
with
the
Bravia
8
managing
to
pick
out
the
individual
strands
of
fur
on
the
apes,
while
also
handling
Caesar’s
burning
funeral
pyre
without
any
noticeable
signs
of
blooming.
Picture
quality
score:
4.5
/
5
Sony
Bravia
8
review:
Sound
quality
Accurate
placement
of
object
sounds
Dynamically
impressive
Still
lacking
in
the
bass
department
Sony
has
once
again
employed
its
Acoustic
Surface
Audio+
technology
here,
which
sees
actuators
placed
behind
the
screen
to
physically
vibrate
it,
turning
the
entire
surface
into
a
speaker.
Not
a
lot
has
changed
in
this
iteration
compared
to
the
A80L,
although
Sony
says
its
added
a
new
tweeter
to
help
boost
higher
frequencies
and,
in
particular,
dialogue.
It’s
a
really
remarkable
system
–
and
the
first
time
I’ve
personally
heard
it
in
action
–
as
when
using
the
same
opening
fight
sequence
from
Shang
Chi,
gusts
of
wind,
flailing
arms
and
attacks
using
the
10
rings
were
accurately
placed
within
the
soundfield;
when
an
attack
was
landed
towards
the
bottom
left
of
the
screen
for
example,
that’s
exactly
where
it
could
be
heard,
as
opposed
to
a
full
sound
coming
from
all
speakers.
When
I
began
the
stream,
I
received
a
pop-up
asking
if
I
wanted
to
activate
the
IMAX
Enhanced
DTS:X
soundtrack
(the
Sony
Bravia
8
is
an
IMAX
Enhanced-certified
TV)
and
there
was
a
genuine
effect
of
height
to
the
audio.
These
effects
were
only
amplified
the
louder
I
turned
up
the
volume
and
they
remained
distortion-free.
The
Voice
Zoom
3
feature
works
incredibly
well,
too,
for
any
spoken
content
that
you
may
have
a
little
trouble
hearing.
Not
only
does
increasing
the
level
help
dialogue
become
easier
to
hear,
it
does
so
without
sounding
separate
from
the
rest
of
the
soundtrack
or
other
audio,
instead
sounding
entirely
natural.
The
same
feature
can
be
used
when
connected
to
an
external
soundbar
or
speaker
system.
The
only
slight
downside
is
that
bass
performance
still
isn’t
a
strong
point
of
Sony’s
audio
system.
While
this
will
undoubtedly
be
a
blessing
to
your
neighbors,
it
does
mean
that
despite
the
Bravia
8
being
more
impressive
than
its
peers
in
the
sound
department,
you
will
want
to
invest
in
one
of
the
best
soundbars
to
experience
more
engaging
home
cinema
thrills.
Taking
the
car
chase
scene
from
The
Batman
as
a
prime
example,
there
isn’t
a
deep
rumble
from
the
Batmobile’s
engine
that
you
would
get
from
an
external
subwoofer,
but
is
certainly
more
engaging
than
most
other
TV
sound
systems.
Sound
quality
score:
4.5
/
5
Sony
Bravia
8
review:
Design
Height
adjustable
feet
in
two
positions
Slimmer
rear
makes
it
easier
to
wall
mount
Invisible
speakers
As
well
as
the
Bravia
8
delivering
a
10%
increase
in
brightness,
I’m
going
to
also
say
it’s
10%
better
looking.
For
starters,
Sony
has
slimmed
the
TV
down
to
a
depth
of
just
37mm,
making
it
easier
to
wall
mount
in
the
process.
This
is
due
to
Sony
removing
the
protruding
rear
housing
for
all
the
connections,
subwoofers
and
processing
electronics
on
the
A80L.
Instead,
the
rear
is
a
uniform
panel
–
something
Sony
calls
“One
Slate”
design
–
and
the
grid
of
etched
squares
has
now
been
increased
in
size
to
cover
the
entire
rear.
You’ll
still
find
a
similar
set
of
connections
on
the
right-hand
side
when
viewed
from
the
back,
including
four
HDMI
ports
(only
two
of
which
are
HDMI
2.1,
and
one
of
these
supporting
eARC),
optical
digital
audio
out,
an
ethernet
port,
RF
antenna
port,
two
USB
type-A
and
an
input
S-Center
speaker
input,
which
you
can
use
to
turn
the
TV
into
a
center
speaker
as
part
of
a
wider
external
sound
system.
If
you
connect
one
of
Sony’s
new
Bravia
Theater
soundbars,
you
can
bypass
the
need
for
this
connection
and
still
use
the
TV
as
a
center-channel
speaker
via
Acoustic
Center
Sync.
Image
1
of
4
The
Bravia
8’s
feet
can
be
adjusted
to
two
different
heights
in
both
a
narrow
or
wide
position.(Image
credit:
Future
/
Max
Langridge)
The
Sony
Bravia
8
TV
remote
is
backlit
and
made
from
up
to
80%
recycled
materials.(Image
credit:
Future
/
Max
Langridge)
It
employs
a
unique
speckled
effect.(Image
credit:
Future
/
Max
Langridge)
(Image
credit:
Future
/
Max
Langridge)
Also
new
for
the
Bravia
8
–
and
the
entire
2024
Bravia
lineup
–
is
the
ability
to
position
the
included
feet
in
any
of
four
ways,
up
from
the
previous
three.
You
can
position
them
in
either
a
narrow
or
wide
configuration
–
meaning
those
with
smaller
TV
stands
can
place
the
Bravia
8
on
top
with
little
issue
–
and
this
time
you
can
raise
the
screen
a
few
inches
in
both
narrow
and
wide
configurations,
to
better
accommodate
a
soundbar
beneath.
A
single
remote
control
comes
in
the
box
this
time
around,
which
is
effectively
the
same
as
the
one
that
shipped
with
the
A80L.
It’s
relatively
long
and
thin,
with
a
central
mic
button
for
voice
recognition
–
I
figure
this
positioning
is
Sony’s
attempt
to
encourage
users
to
interact
with
the
Bravia
8
more
with
their
voice
–
and
direct
buttons
for
six
streaming
services
at
the
bottom.
What
is
perhaps
more
interesting
about
this
remote
control,
however,
is
the
fact
it’s
made
from
approximately
80%
recycled
plastic,
and
the
way
in
which
Sony
produces
the
speckled
design
means
that
each
one
is
ever
so
slightly
different.
It’s
backlit
and
rechargeable
via
USB-C.
Design
score:
4.5
/
5
Sony
Bravia
8
review:
Smart
TV
and
menus
Google
TV
smart
system
Google
Assistant
baked
in
and
‘Works
With’
Alexa/Apple
HomeKit
support
Eco
Dashboard
2
for
power
saving
tips
The
Bravia
8
continues
Sony’s
appreciation
for
the
Google
TV
platform,
which
is
a
smart
thing
to
do.
As
expected,
the
full
suite
of
major
video
and
music
streaming
apps
is
available,
along
with
(quite
literally)
tens
of
thousands
of
others.
The
home
screen,
which
Google
TV
calls
‘For
You’,
shows
you
content
you’re
currently
in
the
middle
of
watching
across
any
installed
apps,
followed
by
recommended
content
based
on
your
viewing
habits
and
Google
Search
history
across
other
devices
when
you’re
logged
into
the
same
account.
Google
Assistant
is
available
for
voice
commands
and
to
help
you
find
whatever
you
want
faster.
(Image
credit:
Future
/
Max
Langridge)
I
did
appreciate
Sony’s
implementation
of
a
quick
settings
menu
system,
whereby
you
just
press
a
button
on
the
remote
control
with
the
wrench
icon
to
bring
up
a
row
of
common
settings
along
the
bottom
of
the
screen,
each
with
its
own
set
of
choices
to
cycle
through.
The
order
of
these
can
be
personalized,
so
if
you
know
you’re
going
to
want
to
adjust
picture
and
sound
settings
the
most,
for
example,
you
can
place
these
at
the
start
of
the
row.
Sony
has
installed
the
second-generation
of
its
Eco
Dashboard
in
the
Bravia
8,
which
presents
the
TV’s
power
consumption
history
in
the
form
of
animated
graphs.
You
can
also
adjust
power-saving
settings
from
this
screen,
with
the
dashboard
indicating
how
much
power
in
kilowatt-hours
(kWh)
you’ll
save.
Naturally,
Chromecast
is
supported
for
streaming
to
the
TV
from
compatible
devices,
as
is
AirPlay
2.
And,
despite
using
Google
TV,
Sony
clearly
doesn’t
want
to
discriminate,
as
it’s
added
‘works
with’
support
for
Amazon
Alexa
and
Apple
HomeKit.
This
was
the
first
time
in
a
long
time
I’d
personally
used
Google
TV.
I’d
read
and
heard
good
things,
so
I
was
keen
to
experience
it
for
myself.
However,
in
comparison
to
LG’s
webOS
TV
system,
which
I’m
very
familiar
with,
I
found
Google
TV
here
to
be
quite
slow
and
clunky.
Button
presses
on
the
remote
control
weren’t
received
with
the
immediacy
I’d
expect
for
a
TV
of
this
caliber.
Smart
TV
and
menus
score:
3.5
/
5
Sony
Bravia
8
review:
Gaming
4K
@
120Hz
and
VRR
support
Dolby
Vision
Gaming
for
compatible
sources
Improved
12.8ms
input
lag
The
Bravia
8
presents
itself
as
a
great
option
for
gamers
thanks
to
its
excellent
color
reproduction
and
improved
HDR
brightness,
and
is
a
natural
partner
for
the
PlayStation
5
thanks
to
Sony’s
‘Perfect
for
PS5’
feature
that
automatically
adjusts
the
image
to
deliver
optimum
results.
Even
if
you
don’t
have
a
PS5,
you
can
still
benefit
from
VRR
and
ALLM,
while
Xbox
gamers
can
take
advantage
of
Dolby
Vision
Gaming.
During
my
testing,
I
measured
an
input
lag
of
12.8ms,
which
is
a
significant
improvement
over
the
16.5ms
lag
on
the
A80L,
putting
the
Bravia
8
on
par
with
the
likes
of
the
LG
G4,
although
the
LG
C4
–
Sony’s
closest
competitor
for
this
telly
–
undercuts
it
further
with
a
figure
of
9.2ms.
(Image
credit:
Future
/
Max
Langridge)
Loading
up
Marvel’s
Spider-Man
2
and
it’s
clear
the
Sony
Bravia
8’s
excellent
lighting
control
when
watching
video
content
is
carried
over
to
gaming.
Spidey’s
suit
and
buildings
exhibit
clear
shine
where
they’re
being
hit
by
sunlight,
while
the
stunning
vistas
in
Grand
Theft
Auto
5
exhibited
fantastic
depth,
with
plenty
of
detail
to
buildings
and
bushland
when
viewed
up
close.
Sony’s
Game
menu
pops
up
at
the
press
of
the
Menu
button
on
the
TV
remote
control,
bringing
up
quick-select
options
for
game
type,
toggling
VRR
on
or
off
and
a
new,
previously
promised
feature
to
adjust
the
screen
size.
You’re
also
able
to
toggle
on
an
on-screen
crosshair,
which
could
help
players
of
FPS
games
get
an
upper
hand.
The
picture
does
improve
when
switching
to
the
LG
G4,
but
this
is
to
be
expected
with
its
greater
control
of
light
and
increased
peak
brightness.
But,
for
a
mid-range
OLED,
the
Sony
Bravia
8
will
be
great
for
gamers.
The
only
thing
that
does
continue
to
hold
it
back
is
that
only
two
of
its
four
HDMI
ports
support
the
2.1
standard
for
4K/120Hz.
If
you
only
have
one
games
console,
this
won’t
be
an
issue
but,
if
you
have
multiple,
then
you’ll
be
better
served
by
a
model
from
LG
or
Samsung.
There’s
also
no
support
once
again
for
Nvidia
G-Sync
or
AMD
FreeSync.
Gaming
score:
4/5
Sony
Bravia
8
review:
Value
Small
premium
over
A80L
but
with
improved
performance
Already
receiving
discounts
LG
C4
can
be
found
for
similar
money
The
Sony
Bravia
8
presents
itself
as
good
value
for
money.
Its
launch
price
is
a
little
higher
than
its
predecessor
in
some
territories,
but
you
are
getting
a
number
of
upgrades,
such
as
the
new
processor
and
Dolby
Vision
Gaming
mode,
to
justify
it.
However,
since
launch,
we’ve
seen
its
price
come
down
and,
at
the
time
of
writing,
there
are
savings
of
up
to
$900
/
£200
/
AU$1,100
direct
from
Sony,
with
third-party
retailers
likely
price-matching
or
beating
those
prices.
While
some
may
have
wished
for
a
greater
leap
in
terms
of
brightness,
it’s
not
a
total
shock
that
Sony
has
continued
to
omit
brightness-boosting
technology,
such
as
MLA
or
Quantum
Dot,
as
these
technologies
are
reserved
for
the
flagship
screens
–
the
LG
C4
gets
the
same
treatment
for
example.
But
considering
what
the
Sony
Bravia
8
can
do,
such
as
displaying
movies
with
great
detail
and
light
control,
and
offering
up
a
number
of
picture
modes
that
work
well
as
opposed
to
the
one
or
two
you
sometimes
find
on
competitor
screens,
it’s
a
fantastic,
affordable
option
for
those
with
dark
rooms.
Value
score:
4/5
Should
I
buy
the
Sony
Bravia
8?
Swipe
to
scroll
horizontally
Attributes
Notes
Score
Features
An
upgraded
processor
and
a
suite
of
features
for
devoted
movie
fans
4.5/5
Picture
quality
Natural
colors
and
impressive
clarity,
but
still
not
as
bright
as
some
flagship
models
4.5/5
Sound
quality
Excellent
sound
for
a
flat-screen
TV,
delivering
great
volume
and
effective
positioning
4.5/5
Design
Invisible
speakers,
four
height
positions
and
a
wall-mount
friendly
depth
4.5/5
Smart
TV
and
menus
Google
TV
is
logical
and
intuitive
to
navigate,
but
occasional
stuttering
hinders
a
smooth
experience
3.5/5
Gaming
Improved
12.8ms
input
lag,
4K
@
120Hz
and
VRR
support
over
two
HDMIs
4/5
Value
Well-priced
considering
performance,
especially
with
discounts
already
dropping
4/5
Buy
it
if…
Don’t
buy
it
if…
Also
consider…
Swipe
to
scroll
horizontally
Header
Cell
–
Column
0
Sony
Bravia
8
LG
C4
TCL
C855
Hisense
U8N
Price
(65-inch)
$2,799
/
£2,699
/
AU$4,495
$2,699.99
/
£2,699
/
AU$4,299
£1,299
/
AU$2,295
$1,499.99
/
£1,799
/
AU$2,699.99
Screen
type
OLED
OLED
QD
mini-LED
QLED
with
mini-LED
Refresh
rate
120Hz
120Hz
144Hz
144Hz
HDR
support
Dolby
Vision,
HDR10,
HLG
Dolby
Vision,
HDR10,
HLG
Dolby
Vision,
HDR10+,
HDR10,
HLG
Dolby
Vision
IQ,
HDR10+,
HDR10,
HLG
Smart
TV
Google
TV
webOS
24
Google
TV
Google
TV
(US),
VIDAA
elsewhere
HDMI
ports
4x
(2x
HDMI
2.1)
4x
HDMI
2.1
4
(2x
HDMI
2.1)
4
(2x
HDMI
2.1)
How
I
tested
the
Sony
Bravia
8
While
this
was
my
first
time
using
a
Sony
TV
for
an
extended
period
of
time,
I
have
previously
tried
and
tested
a
few
LG
TVs.
So
the
first
I
did
was
dive
into
menus
to
familiarize
myself
with
the
setup,
then
played
a
variety
of
content
from
streaming
apps
and
via
4K
Blu-rays
playing
on
a
PlayStation
5
over
the
course
of
five
weeks.
I
streamed
content
in
both
SDR
and
HDR
and
assessed
the
available
picture
mode
options
for
each
from
services
including
Netflix,
Disney
Plus
and
Prime
Video.
I
found
Professional
to
offer
the
best
results
for
non-Dolby
Vision
content,
and
the
Dolby
Vision
Bright
setting
for
content
produced
in
that
HDR
format.
I
also
toggled
between
the
calibrated
picture
modes
for
Netflix,
Prime
Video
and
Sony
Pictures
Core,
and
found
the
settings
for
Prime
Video
to
be
the
weakest
of
the
three,
in
the
sense
that
there
was
no
obvious
difference
to
the
overall
picture.
Sony
has
revealed
that
a
65-inch
model
of
its
2024
flagship
TV,
the
Bravia
9,
will
be
released
in
Europe,
including
the
UK,
with
a
planned
release
in
November.
An
Australian
release
is
yet
to
be
announced.
Currently,
there
is
no
official
EU/UK
pricing
for
the
new
65-inch
model,
but
in
the
US
it
retails
for
$2,999
(launched
in
July
at
$3,299),
so
it’s
likely
to
retail
in
the
UK
for
a
similar
amount.
Originally,
only
the
75
and
85-inch
models,
which
retail
for
£3,999
and
£4,499,
respectively,
were
set
to
be
available
in
Europe,
with
the
65-inch
set
to
be
a
US-only
release.
The
headline
news
with
the
Bravia
9
upon
its
initial
release
was
Sony’s
decision
to
drop
OLED
in
favour
of
mini-LED,
and
at
the
time
it
was
a
surprising
move.
But,
when
we
saw
Sony’s
new
backlight
tech
in
action,
which
uses
new
22-bit
drivers
and
new
XR
Backlight
Master
Drive
tech,
we
were
suitably
impressed
–
especially
by
its
OLED-level
contrast
and
blacks.
Other
headline
features
for
the
Bravia
9
include
its
2.2.2-channel
speaker
array
with
new
Beam
Tweeters
and
Acoustic
Multi
Audio+
for
immersive
sound,
a
Prime
Video
Calibrated
picture
mode
created
to
display
Prime
Video
TV
shows
and
movies
as
intended,
and
a
‘Perfect
for
PS5’
Auto
Tone
Mapping
feature
for
gaming.
Since
its
release
we’ve
reviewed
the
Bravia
9
–
check
out
some
of
our
thoughts
below.
Great
news
for
the
other
side
of
the
Atlantic
While
some
of
the
best
75-inch
TVs
and
best
85-inch
TVs
may
be
popular,
if
not
standard,
in
the
US,
in
the
UK
and
Europe
65-inch
remains
one
of
the
most
popular
sizes
overall.
So,
it
seemed
a
very
odd
decision
by
Sony
to
release
the
65-inch
Bravia
9
in
the
US
only.
This
U-turn
is
welcome
news
for
Sony
fans,
and
here’s
why.
Sign
up
for
breaking
news,
reviews,
opinion,
top
tech
deals,
and
more.
In
our
review,
we
found
that
the
Bravia
9
put
itself
forward
as
a
contender
in
the
best
TV
category.
The
new
mini-LED
backlight
tech
that
impressed
us
so
much
in
a
demo
proved
just
as
excellent
in
real-world
testing.
Its
black
levels
and
contrast
did
indeed
rival
that
of
the
best
OLED
TVs
and
its
high
brightness
was
effectively
implemented,
which,
combined
with
its
anti-reflection
screen,
make
it
one
of
the
best
TVs
for
sport.
The
Bravia
9
also
wowed
with
its
built-in
audio,
delivering
a
‘full-bodied’
sound
that
was
expansive,
extending
beyond
the
screen
itself.
Combining
it
with
a
compatible
Sony
soundbar
also
unlocked
even
more
features.
Thanks
to
its
gaming
features,
especially
the
effective
Auto
HDR
Tone
Mapping
for
PS5,
and
gaming
performance,
we
named
the
Bravia
9
as
the
‘best
elite
TV
for
PS5’
in
our
best
gaming
TVs
guide.
The
Bravia
9
does
carry
a
premium
price
in
all
sizes,
so
it’s
a
shame
that
people
in
Europe
had
to
settle
for
the
larger,
and
pricier,
75-
and
85-inch
models.
Now,
with
the
65-inch
coming,
it
could
tempt
more
buyers.
It’s
looking
to
still
be
pricier
than
other
premium
sets
such
as
the
Samsung
S95D
and
LG
G4,
but
here’s
hoping
Sony
gets
the
price
right.
If
you’re
lucky
enough
to
live
somewhere
where
summer
doesn’t
just
mean
warmer
rain,
outdoors
is
the
new
indoors:
it’s
where
we
take
our
Bluetooth
speakers,
where
we
take
our
smart
cookers
and,
if
Samsung
has
any
say
in
it,
where
we
put
our
TVs
too.
But
of
course
you
can’t
simply
stick
one
of
the
best
OLED
TVs
on
the
terrace
or
in
your
yard
unless
you
want
to
squint
at
it
in
the
sunshine
before
it
gets
full
of
rain
and
bugs.
Hence
The
Terrace,
Samsung’s
range
of
TVs
designed
to
live
outside
no
matter
what
the
weather.
Samsung
has
added
a
whole
bunch
of
new
TVs
to
the
Terrace
range,
including
65
and
75-inch
Full
Sun
models
and
55,
65
and
75-inch
Partial
Sun
models.
They’re
designed
to
deliver
serious
brightness
so
you
can
see
the
picture
clearly
on
a
sunny
day,
which
is
why
Samsung
has
put
Neo
QLED
displays
inside,
and
they
come
with
IP56
ratings,
the
highest
water
and
dust
resistance
ratings
of
any
Samsung
TVs.
Samsung
The
Terrace
Full
Sun
and
Partial
Sun
TVs:
features,
pricing
and
availability
There
are
two
new
partial
sun
models,
and
they
cost
$3,499
for
the
55-inch
(so
around
£2,675
or
AU$5,253),
$4,999
for
the
65-inch
(about
£3,820
or
AU$7,506)
and
$6,499
for
the
75-inch
versions
(roughly
£4,968
or
AU$9,758)
respectively.
Full
Sun
models
start
at
$7,499
(around
£5,730
or
AU$11,259)
for
65
inches
and
$9,999
(£7,645
or
AU$15,010
approx)
for
75
inches.
Each
of
the
TVs
in
the
range
is
built
around
a
very
bright
quantum
matrix
Neo
QLED
display
with
very
wide
viewing
angles,
and
they’re
powered
by
Samsung’s
NQ4
AI
Gen2
Processor.
In
order
to
minimize
glare
they
come
with
anti-reflective
screens,
and
the
built-in
audio
is
loud
enough
for
pretty
big
outdoor
spaces:
40W
through
four
speakers.
There’s
another
key
difference
between
these
Samsung
TVs
and
TVs
designed
for
indoor
life:
The
Terrace
TVs
are
designed
to
withstand
serious
heat,
so
for
example
the
Full
Sun
models
are
designed
to
withstand
temperatures
of
up
to
122ºF,
and
to
operate
in
direct
sunlight
for
up
to
6
hours
at
104ºF.
As
you’d
expect,
there’s
Samsung
SmartThings
integration
with
your
smart
home,
and
the
new
TVs
also
include
the
Samsung
TV
Plus
and
Gaming
Hub
to
deliver
over
2,700
free
channels,
which
include
over
360
Samsung
TV
Plus
channels
and
thousands
of
games
for
console-free
play.
The
new
TVs
are
available
for
pre-order
from
this
week
at
Samsung.com.
Sign
up
for
breaking
news,
reviews,
opinion,
top
tech
deals,
and
more.